Spring Security는 자바 어플리케이션에서 인가와 인증을 제공하는 것에 초점을 맞춘 프레임 워크이다. 스프링에서 주장하기로는 Spring security의 확장성이 매우 큰 장점이라고 한다.
근데 사실 Spring security를 사용하면 상당히 추상적이라 어떻게 접근 권한을 부여하는지에 대한 이해가 부족한 채로 그냥 사용하는 경우가 많다. 쇼핑몰을 만드는 프로젝트를 하면서 관리자 페이지랑 사용자 페이지랑 구분하면서 Spring security를 사용했다. 근데 너무 이해가 안되고 어떤 방식으로 굴러가는지도 파악이 안되서 아키텍쳐를 뜯어 봐야겠다는 생각이 들어 글을 쓰게 되었다.

먼저 그림을 보고 그림을 바탕으로 글을 진행하겠다.
1. Authentication Filter
request가 들어오면 이에 대한 인증과 인가를 진행해주는 부분이다. 이러한 filter의 적용은 request가 dispatcher servlet에 적용되기 전에 적용되기 때문에 허가 받지 않은 request가 dispatcher에 의해서 처리되는 것을 방지해준다.
그럼 filter가 적용되는 전체 코드를 보자

먼저 request가 matcher가 검사를 진행하는데 이는 아마 request가 깨지지 않았는지 검사하는 부분 같다. 그렇게 생각된 이유는

requestMatcher가 호출하는 match 코드를 봤을 때 Collection이나 Map형식이면 통과를 시켜주기 때문이다.
만약 request가 올바르다면 this.attemptAuthentication(request, response)부분이 적용이 된다.

이 부분이 아키텍쳐에서 2번째 부분을 담당하는 것으로 파악된다. 왜 그렇게 파악했는지는 뒤에 좀 더 설명을 하겠다.
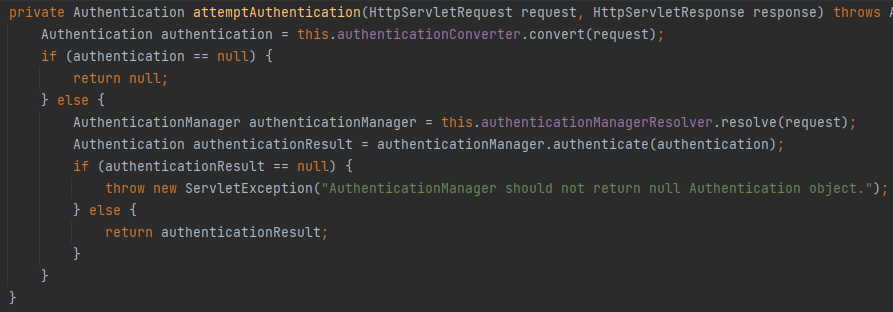
그럼 attemptAuthentication부분을 조사해보자.

일단 첫번째로 request를 authentication 객체로 바꿔주는 authenticationConverter를 이용해 request를 authenication 객체로 전환해준다.
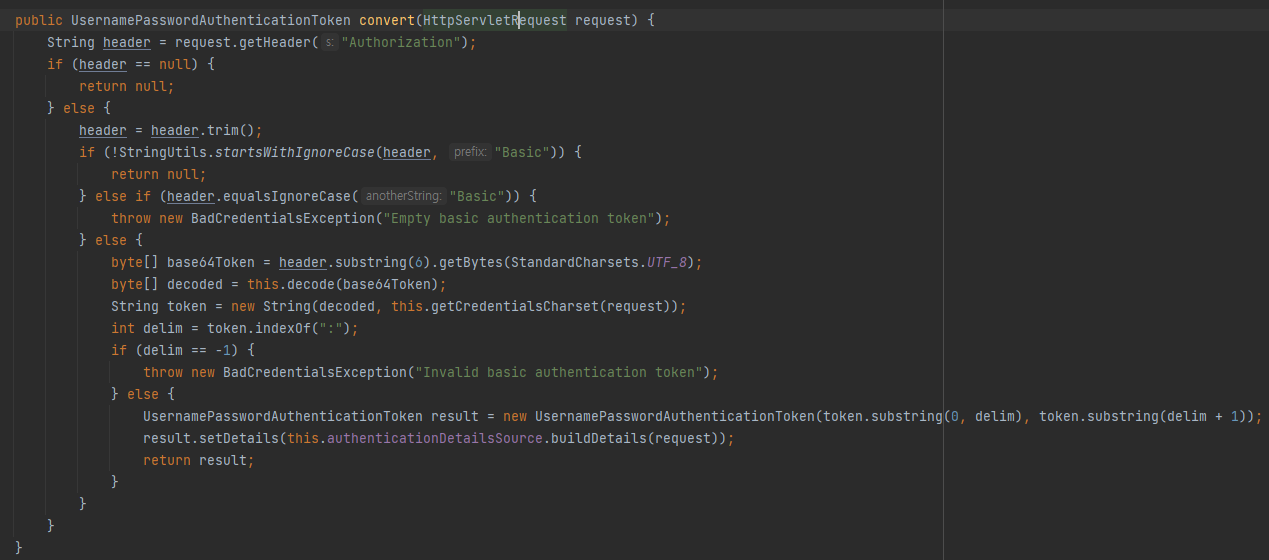
그럼 authenticationConverter는 무엇일까? 파악해본 결과 이는 다형성을 이용해서 AuthenticationConverter로 선언되어있다. 따라서 사용자가 이를 custom한 AuthenticationConverter로 이를 처리해줄 수 있는 부분으로 파악된다. 하지만 기본적으로 Spring에서 사용하는 authenticationConverter는 BasicAuthenticationConverter이다. 이러한 BasicAuthenticationConverter에서 convert해주는 부분에서 사용하는 인증 방식은 UsernamePasswordAuthenctication이다.
2. UsernamePasswordAuthentication

여기서 우리가 흔히 토큰 기반 인증 방식을 처리하는 부분이 들어있다.
여기서 request의 header에서 토큰을 받아 해당 토큰을 decoding해서 authentication처리를 하는 것을 알 수 있다.
해당 함수에서 반환된 객체는 Authentication 객체로 처리가 된다.
3. AuthenticationManager
이후 코드를 다시 살펴보면

request를 가져와서 처리해주는 부분이 다시 존재하게 된다. 여기 부분을 공부 하면서 request를 가져왔으면 된거 아닌가 왜 또 request가 쓰이지? 라는 생각이 들었다. 하지만 이러한 AuthencticationManagerResolver가 implementation된 부분을 살펴 보면 request를 context로 지칭하고 이를 바탕으로 authenticationManager를 반환하는 것을 볼 수 있다.

그럼 의문이 들 수 있다. 왜? 그냥 authenticationManager를 request마다 반환되게 만드는 부분을 추가했을까? 역시나 customising 부분 때문이라는 생각이 든다. 실제로도 검색 결과 request마다 authenticationManager를 선택할 수 있게 authenticationManagerResolver를 두었다는 설명을 찾을 수 있다.

그럼 이러한 AuthenticationManager를 AuthenticationManagerResolver를 통해 request에 따라 결정이 되면 AuthenticationManager는 아까 받은 Authentication객체에 대해 인증하는 부분을 거친다.
그렇다면 이러한 AuthenticationManager는 인터페이스인데 실제로 Implemenation한 녀석은 누구일까? 위의 그림에서도 볼 수 있듯이 ProviderManager라는 녀석이 이러한 AuthenticationManager를 Implementation한 녀석이라는 것을 알 수 있고 실제 코드에서도

다음과 같이 AuthenticationManager를 Implementation하는 것을 볼 수 있다. 그럼 이러한 ProviderManager가 authentication한 부분을 살펴보자.
public Authentication authenticate(Authentication authentication) throws AuthenticationException {
        ...
        Iterator var9 = this.getProviders().iterator();

        while(var9.hasNext()) {
            AuthenticationProvider provider = (AuthenticationProvider)var9.next();
            if (provider.supports(toTest)) {
               ...

                try {
                    result = provider.authenticate(authentication);
                    if (result != null) {
                        this.copyDetails(authentication, result);
                        break;
                    }
                } ...
        }

        ...

        if (result != null) {
            if (this.eraseCredentialsAfterAuthentication && result instanceof CredentialsContainer) {
                ((CredentialsContainer)result).eraseCredentials();
            }

            if (parentResult == null) {
                this.eventPublisher.publishAuthenticationSuccess(result);
            }

            return result;
        } ...
    }
인가하는 부분의 코드가 길다. 하지만 일단 특이한 점은
- CredentialContainer라는 부분을 사용하는데 인증이 끝나고는 비워준다.
이 부분은 아까워 조금 일맥상 통하는 부분인데 이러한 CrendentialContainer를 사용하는것이 위에서 언급한 UsernamePasswordAuthenticationProvider이고 이 부분에서도 eraseCredential이라는 부분이 존재한다. 즉, 우리가 알 수 있는 사실은 ProviderManager라 authentication을 끝내고 코드 상에 남아있을 수 있는 credential(비밀번호)와 관련된 정보를 지우는 것을 볼 수 있다. - eventPublisher사용
결과가 나오면 이 결과에 대해 eventpublisher에게 전달하여 event를 발생시키는 것을 알 수 있다.
그리고 가장 중요한 지점은 authentication을 수행하는 주체!일것이다. 이러한 authentication을 수행하는 주체는 코드에서도 볼 수 있듯이 authentication Provider이다.
4. Authentication Provider
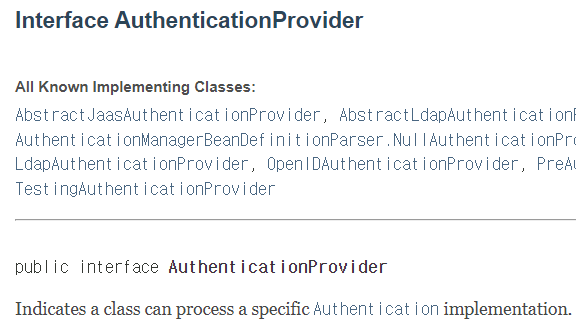
이러한 Authentication Provider도 interface다. 이에 대한 Spring에 설명도

아래와 같이 나온다. 그냥 authentication을 implementation할때 사용하는 interface라는 거다. 그럼 이를 implemenation한 객체를 봐야할 것이다.
위의 도표에서도 이를 Implementation한 class가 많은 것을 볼 수 있을 것이다. DaoAuthentcationProvider, CasAuthenticationProvider 등등...
근데 해당 authenticationProvider 들은 UserDetail과의 접점을 발견할 수가 없어서 그냥 CustomAuthenticationProvider를 가져와봤다.
@Component
public class CustomAuthenticationProvider implements AuthenticationProvider {
    private final CustomUserDetailsService userDetailsService;
    private final SamplePasswordEncoder passwordEncoder;

    public CustomAuthenticationProvider(CustomUserDetailsService userDetailsService, SamplePasswordEncoder passwordEncoder) {
        this.userDetailsService = userDetailsService;
        this.passwordEncoder = passwordEncoder;
    }

    @Override
    public Authentication authenticate(Authentication authentication) throws AuthenticationException {
        String username = authentication.getName();
        String password = (String) authentication.getCredentials();

        UserDetails user = userDetailsService.loadUserByUsername(username);
        if (user == null) {
            throw new BadCredentialsException("username is not found. username=" + username);
        }

        if (!this.passwordEncoder.matches(password, user.getPassword())) {
            throw new BadCredentialsException("password is not matched");
        }

        return new CustomAuthenticationToken(username, password, user.getAuthorities());
    }

    @Override
    public boolean supports(Class<?> authentication) {
        return CustomAuthenticationToken.class.isAssignableFrom(authentication);
    }
}
이렇게 authentication 객체에서 이름과 패스워드를 가져와서 이를 password encoder를 이용하여 user가 맞는지 안 맞는지를 검사하게 해준다.
이때 사용하는 것이 UserDetailsService이다.
5. UserDetailService
UserDetailService는 Spring docs에 의하면

라고 나와있다. 즉, 우리가 인증과 관련된 일을 처리할 때 User의 정보를 가져오는 부분이라고 볼 수 있을 것이다.
따라서 우리가 SpringSecurity를 가져올 때 이러한 UserDetailService를 Implementation한 부분을 custom하여 로그인의 request에 대한 처리를 진행해 줄 수 있는 것이다.
public class MemberService implements UserDetailsService {
    private final MemberRepository memberRepository; // RequiredArgsConstructor 어노테이션으로 인해 final이나 @NonNull이 붙은 필드에 생성자를 생성해줍니다.

    public Member saveMember(Member member){
        validateDuplicateMember(member);
        return memberRepository.save(member);
    }

    private void validateDuplicateMember(Member member){
        Member findMember = memberRepository.findByEmail(member.getEmail());
        if(findMember != null){
            throw new IllegalStateException("이미 가입된 회원입니다.");
        }
    }

    @Override
    public UserDetails loadUserByUsername(String email) throws UsernameNotFoundException{
        Member member = memberRepository.findByEmail(email);

        if(member == null){
            throw new UsernameNotFoundException(email);
        }

        return User.builder()
                .username(member.getEmail())
                .password(member.getPassword())
                .roles(member.getRole().toString())
                .build();
    }
}
다음과 같이 말이다.
여기서 중요한 점은 loadUserByUsername이라는 부분을 오버라이딩을 해줘야한다는 것이다. 이 부분에서 반환값은 UserDetail인데 UserDetail은 이후 AuthenticationToken을 만들 때 사용된다. 이를 이용해서 AuthenticationProvider는 user를 만들고 이를 바탕으로 다음과 같이

Authentication 객체 중 authenticaiton이 true인 객체를 생성해서 반환한다.
이렇게 받은 authenticaiton을 authenticationProvider가 authenticationfilter에 반환해준다. 이후 이 결과를 받은 AuthenticationFilter는 이를 다음과 같이

securitycontextholder에 이를 저장하게 된다.
요약
- request가 들어오면 이를 Authenticationfilter가 낚아챈다.
- Authenticationfilter에서는 이를 UsernamePasswordAuthenticationToken에 넘겨주어
- Authentication 객체로 만든다.
- 이렇게 만들어진 Authentication객체를 AuthenticationManager에 넘겨준다.
- AuthentciationManager는 AuthenticationProvider를 호출하여 이러한 Authentication을 처리하게 한다.
- AuthenticationProvider는 UserDetailService를 이용해서 Authentication 처리를 한다.
- 처리하게 되면 AuthenticationToken이 생성되고 이를 AuthenticationProvider에 넘겨준다.
- AuthenticaitonProvider는 이를 이용해서 User 객체를 만들고 이를 이용해서 Authenticaiton 객체 중 인증이 성공한 Authentcation객체를 생성하고 이를 반환한다.
- AuthenticaitonManager는 이를 AuthenticationFilter에 넘겨준다.
- AuthenticationFilter는 이를 SecurityContext에 등록하게 된다.
참조
https://www.javainuse.com/webseries/spring-security-jwt/chap3
Understand Spring Security Architecture and implement Spring Boot Security | JavaInUse
www.javainuse.com
https://docs.spring.io/spring-security/reference/
Spring Security :: Spring Security
If you are ready to start securing an application see the Getting Started sections for servlet and reactive. These sections will walk you through creating your first Spring Security applications. If you want to understand how Spring Security works, you can
docs.spring.io
https://github.com/spring-projects/spring-security
GitHub - spring-projects/spring-security: Spring Security
Spring Security. Contribute to spring-projects/spring-security development by creating an account on GitHub.
github.com
긴 글 읽어주셔서 감사합니다.
틀린 부분이 있으면 댓글을 달아주시면 감사하겠습니다.
📧 : may3210@g.skku.edu
'개발 > Spring' 카테고리의 다른 글
| [Spring] Rest Docs 빌드 부터 사용까지 (2) | 2022.01.24 |
|---|---|
| [Spring] Spring과 Paging - [1] (0) | 2022.01.20 |
| [Spring] Spring 을 이용한 웹 서비스 구조 (0) | 2022.01.12 |
| [Spring]@Transactional과 JUnit Test (2) | 2022.01.11 |
| [Spring MVC] DispatcherServlet은 어떻게 request랑 controller를 이어줄까? (0) | 2022.01.06 |
![[Spring] Spring Security의 이해](https://img1.daumcdn.net/thumb/R750x0/?scode=mtistory2&fname=https%3A%2F%2Fblog.kakaocdn.net%2Fdna%2FPziTC%2Fbtrq7UfptP9%2FAAAAAAAAAAAAAAAAAAAAAAimnz4phbcRR5rXAk-9Ebl4kye8SvlSO56ouOPucxHM%2Fimg.jpg%3Fcredential%3DyqXZFxpELC7KVnFOS48ylbz2pIh7yKj8%26expires%3D1764514799%26allow_ip%3D%26allow_referer%3D%26signature%3DSVFCb4ylLrUqFV6vdyOnwEE4L8E%253D)